


How to set up a PA system
Tips for beginners

In this article: We'll look at the basics of how a PA system works. Then I'll share some tips for setting up a PA system, including...
Miking the stage for live performance
PA system cables and connections
Tools and accessories you'll need for setting up a PA
Powering up the system once it's all connected
...and we'll also talk about powering the PA system off and breaking it down.
During my college years, I was in a working band that played nightclub and college fraternity shows in Charlottesville and other towns in the region. We never bought a PA, but my roommate was the soundman for another band, and we also used other for-hire soundpeople in town, as well as the house systems at the clubs.
That’s around the time I really absorbed the fact that setting up a PA properly (and breaking it down) often takes longer than the musical performance it’s making sound for. I also learned how much having a good, well-run PA really makes a difference, both for the band and the audience.
For great sound from a PA, the same basic rules apply whether you’re setting up a small vocal PA in your band’s practice space, or a more extensive system with mics for every instrument on a church, theater, or club stage.
How does a PA work?
A PA provides “sound reinforcement.” A basic rule of thumb: if your source is loud enough without a PA, you don’t need a PA. A person playing acoustic guitar and singing in a school classroom probably doesn’t need a PA.
The primary purpose of a PA is to make things sound “balanced” more than “loud.” Part of getting that balance comes from the instrumentation and the experience level of the people making the music. If the musicians can create a balanced onstage sound, it simplifies the soundperson’s work.

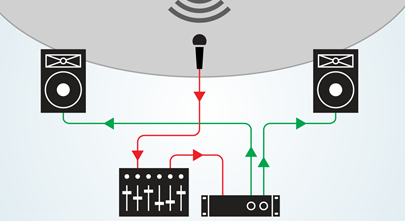
A PA system takes the sound from your sources through the mixing/amplification stage and on to your loudspeakers.
Some stage sound sources, like bass or electronic keyboards, can connect directly to the PA mixer. Others, like drums, voice, and (most of the time) electric guitar, get miked. Each instrument or vocal microphone gets connected to the mixer and has its own channel.
A soundperson controls the channel volume levels and other settings with the mixer. They also control the overall output levels of the mix that comes out of the PA speakers.
How many watts do I need for a PA system?
It’s not quite as simple as more watts = better, but to a certain extent it’s true.
If you’re using passive PA speakers, you need to make sure that your amp’s power output matches your speakers’ power-handling capability and impedance. Check out our PA amplifier buying guide to learn more about impedance matching.
With powered PA speakers, you don’t have to worry about that, since their built-in amps are custom-designed for the cabinets.
How many mics do I need for a PA system?
The number of mics you’ll need depends on your space and the instrumentation of what you’re using the PA for.
Let’s say you have a three-person band — electric bass, electric guitar, and drums. Let’s say that everyone sings, and that the space the band plays in is a relatively small room, say 20’ x 30’.

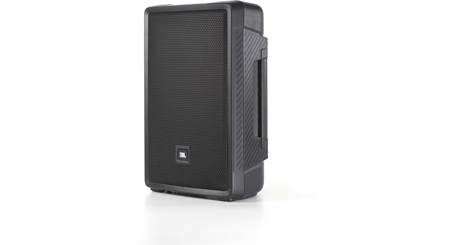
A rock trio keeping it simple with a pair of mics and a JBL PRX ONE portable powered PA system.
The voices will need mics; the instruments may well not. If the space was bigger, like 30’ x 40’, you might need to put a mic on the kick drum and the guitar amp. And as the space grows, eventually pretty much every onstage source will benefit from having its own mic, including every drum in the kit.
How do I set up a PA system without feedback?
Most microphones that you use with a PA have a directional polar pattern that picks up only (or mostly) what’s right in front of it. Still, even a super-directional mic will pick up other sounds around it if they’re loud enough.
And if a mic picks up the sound it itself is amplifying and playing through the PA speakers, you’ll get the howling, potentially ear- and gear-damaging noise known as feedback.
To avoid feedback, make sure to situate your speakers so that none of them are pointed at any of your microphones' pickup patterns.
PA main speakers
The speakers aimed at your audience are your "mains." A typical setup has right and left mains. The bigger your PA system, the more mains you'll have on either side.
PA subwoofers
Sometimes just called "subs," subwoofers pump out bass you literally feel more than hear. They also allow your mains to run more efficiently, since they don't have to handle those power-greedy low frequencies.
PA monitor speakers
Musicians use monitors to hear themselves on stage. These are wedge-shaped speakers placed at musicians’ feet and aimed at their faces.

To avoid feedback, a floor-wedge monitor should be aimed at the performer's ears — but not into the microphone.
In-ear monitors and headphones
In-ear monitors and headphones help musicians maintain a lower stage volume for a cleaner mix. That’s because unlike speaker wedges, in-ear monitors and headphones don’t produce audible sound that will bounce around the stage and find its way into the microphones.

Drummers can get loud. In-ear monitors help keep stage volume under control and deliver an up-close monitor mix.
Lower stage volume helps you get better PA sound
I’ve been in dozens of soundcheck situations where the soundperson has told the band: “Stage volume needs to come down.” Some bands can turn down. Some respond: “You wouldn’t tell Neil Young and Crazy Horse to turn down, would you?”
I think it’s fair to say that many if not most electric guitar players have clashed with a soundperson who told them to turn down because they were ruining the mix. When that happens, it usually means the guitar is too loud for the mix even when the soundperson has it turned all the way down.
And the battle continues. Guitar players, do your soundperson a favor (even if you’re the guitar player and the soundperson): use lower-powered guitar amps that can reach their sweet spot at lower volumes.
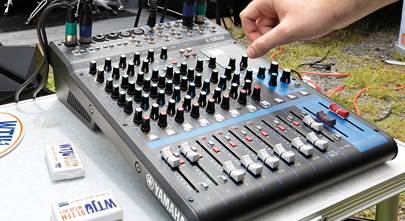
Helpful tools and accessories for PA setup
You shouldn’t need any tools to set up a simple PA system. But almost every professional soundperson I’ve worked with kept a multi-tool, gaffer’s tape, heavy duty extension cords and power strips, and a marker handy, along with a more extensive box of tools.

It's helpful to keep a box of useful tools handy — like a permanent marker, gaffer's tape, wire strippers, power strips, etc.
That would include things like a multimeter, cordless screwdriver, soldering gear, wire cutters/strippers, and other stuff you might need to repair broken cables, replace damaged speaker drivers, and remedy other common mishaps that can befall a much-used PA.
But for perspective, my practice PA, a Yamaha EMX 66M powered mixer, hasn’t needed a tool since I bought it over 20 years ago.
Miking the stage for live performance
Acoustic ensembles with bluegrass, jazz, and classical instrumentation sometimes just use ambient overhead mics, or a single mic around which the musicians gather, with none getting too close.
But when you get to rock and roll, or any music with amplified sources (notably, but not only, the electric guitar), PA sound reinforcement gets more complicated.
Usually, and especially on a stage with loud amplified instruments, you want to place each mic as close to its source as possible.

Close-miking the guitar amp lets you pick up a clear signal with minimum extraneous noise.
The closer your mic to the source, the less you’ll have to turn up the mic's level to get a usable signal to work with in the mix. That’s important because the more you turn up the mic, the more apt it is to pick up other sounds beyond your source, which can clutter up the mix and/or cause feedback.
When a mic isn’t being used, turn it down or off. You don’t need it picking up extra noise.
Mic and speaker placement
If you want to understand feedback, hold a hot mic right in the cone of a speaker through which it’s playing. You’ll get feedback. And you’ll understand why you should never aim mics directly at speakers that way.
For precisely this reason, you need to put your main speakers facing the audience, then set up your mics behind them. And place monitors in front of performers so that their mics are pointed in the opposite direction that the monitors are firing.
Don’t forget mic stands and clips
Placing microphones exactly where you want them is a lot easier if you have the right mic stands. They come in a lot of different form factors.
Boom stands with maximum adjustability are great but can take up valuable stage real estate.

A mic stand with an adjustable boom arm gives you the flexibility to place the mic exactly where you need it.
A straight stand with simple height adjustment might be perfect for a lead singer who doesn’t play an instrument. But for singers who also play guitar, bass, keyboards, or whatever, a boom stand can provide the needed clearance.
You probably wouldn’t want to use a full-sized boom stand to mic your kick drum, even though you could. Instead, use a mini-boom stand, like this one from Gator Frameworks. A lot of drum mics come with clips that allow you to attach them to each drum without a stand.
Most mics come with clips to attach them to stands. And most mic stands include cable-routing clips to help keep wires snug against them and out of the way. Securing your mic cables to your stands keeps you from getting tripped up as you move around the stage.
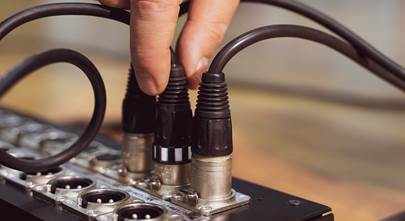
PA cables and connections
Pro audio cables come in a variety of lengths. It’s nice to have speaker, mic, and patch cables that are the right length for connecting everything to the PA. It’s also a good idea to have a spare cable or two of each type in case one gets damaged.
Connecting sources to the PA mixer
Microphones connect to the mixer with XLR cables. Some instruments can connect directly to the PA mixer without a mic, either going straight in with a 1/4” or XLR cable, or first into a direct box that adjusts its signal to a level suitable for mixing, then on into the mixer.
Some mixers have a dedicated RCA, 1/4”, or 3.5mm aux input for connecting a computer, tablet, smartphone, or other music player, which can be useful for checking how the mains sound before you’ve even miked anything, and for playing music before, between, and after the live performances.
Connecting amplifiers and speakers to the PA mixer
The dedicated stereo main and monitor outputs on the mixer connect to a PA amplifier and speakers to make sound. You can use powered PA speakers that have perfectly matched built-in amplification, or passive speakers powered by one or more external amplifiers.
Powered speakers connect with balanced XLR or 1/4” TRS cables. Non-powered speakers use speaker cables with 1/4”, Speakon, or even bare-wire or banana plug binding-post connections.
Whatever type of PA speaker you use, it's a good idea to have some stands to mount them on for better sound dispersion.
Powered speaker setup
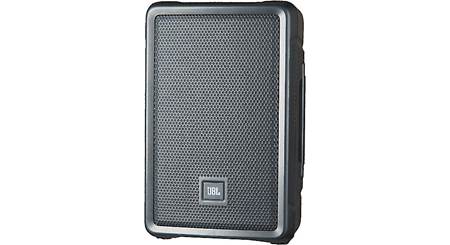
Most powered speakers have onboard EQ control and/or a switch for choosing whether you’ll be using it as a monitor or main speaker.

Many powered speakers have EQ presets for monitor and main speaker applications. The high-pass filter can help you tailor your sound.
The monitor setting on the powered speaker shown above cuts low frequencies to help keep a manageable stage volume and give the performers a crisp, clear monitor feed.
You’ll want to make sure that you use the same settings for all your main speakers, and likewise for your monitors.
Power up and line check the PA
When you’re setting up your PA, protect your gear (and keep your audio signal clean) by making sure you’re plugged into a power conditioner, and that everything is properly connected. Turn your main, monitor, and channel volume levels all the way down and set all your channel EQ levels to zero before you power up.
Once everything’s connected, turn the main volume up to unity gain (or 0dB). Most mixers have an indicator on their volume dials to indicate unity gain at around 8 out of 10, and at that setting the output has the same volume as the input.

Volume and other PA level controls have indicators on their dials at unity gain — where input volume equals output volume.
Then start with a single mic channel. Bring its volume up slowly, testing it with that familiar mantra: “testing 1-2-3, testing 1-2-3” until you get a good-sounding level. For instrument mics, instead of speaking into the mic, have each musician play a bit to give you a test signal separately.
If you get no sound at all on a particular channel, check all that channel’s connections to make sure everything’s done right. You might find a plug that’s not fully connected, or a faulty cable.
If you get feedback before you reach a good volume level, pull the channel volume down until it stops feeding back. Then you can experiment with EQ. Entry-level mixers usually just have low- and high-frequency adjustments, while higher-end models will have more extensive EQ control.

Use high-pass filters and equalizers to achieve a balanced, ear-pleasing sound.
Do the same for each channel, muting already tested channels as you go. Once you're satisfied with the volume settings for the main speakers, go through the same process with the monitors.
Soundcheck and live sound mixing
Once you’ve checked all the individual channel levels, have all the performers run through a song. Adjust volume levels for balanced monitor and main mixes.
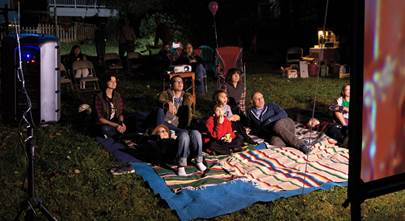
If you’re running sound for an actual performance, keep in mind that the same mixer settings will sound different once an audience fills the empty room you mixed in at soundcheck. You’ll most likely need to make some adjustments once the band takes the stage.

Warm bodies change the sound of the room: once the audience shows up, you'll probably need to adjust the mix.
Powering off and breaking down the PA
When the music is over, be sure to power down the PA before you start to disconnect everything. Coil your cables carefully, store your mics in their cases, and pack it all up for the next gig.
Cable storage and transport
Keeping your collection of cables organized is also well worth the effort. That way you don’t have a bunch of extra wire cluttering the stage — or wherever you store your cables when you're not using them.

Give your microphone and speaker cables a twist with each coil so everything lays flat and doesn't get tangled up in your storage container.
A generous soundman at a club my college band played showed me how to coil a cable by giving it a little twist with each coil. That mimics the action of reeling it in to prevent kinks. Another soundman actually used a hose reel to roll up his XLR cables end to end, attaching them to one another.
Hook-and-loop cable ties can also help keep your cables organized. For storage and transportation, I’ve used old backpacks and suitcases of all shapes and sizes. You could also use plastic storage bins or whatever you have that fits your kit.
Mic cases
Many mics come with protective cases for storage. You can also buy cases especially designed for storing multiple mics, or improvise with used luggage from a thrift store or your own basement.
Want to learn more?
If you want to learn more about PA equipment in general, check out our Introduction to live sound equipment.
Some of our other pro audio buying guides feature:
Still have questions?
Want friendly, one-on-one help choosing the best gear for your PA system? Our expert Advisors can help. Contact us today for free, personalized advice. Free lifetime tech support is included with every Crutchfield purchase.


Jomar N Puclalay from Philippines
Posted on 10/29/2020
Can you show us your connection from the mixer to the amlifiers or powered speakers, (sub/mid) thanks??
Jim Richardson from Crutchfield
on 10/30/2020
Sriks K from Aldie
Posted on 11/14/2019
Great! information with detailed setup. Appreciate your write up
johnn from Tunetown
Posted on 8/21/2019
Not elementary enough - One of the biggest trip ups for the beginner is: what types of cables to buy? It would have been more helpful if you had specified the type of cable to run from the mixer to the powered speaker.
Jim Richardson from Crutchfield
on 8/22/2019
TERRY WOOD from Wichita, ks
Posted on 6/3/2017
Very Good 411...OnE WorD..*CRUTCHFIELD* E-NUFF SAID!
R.V. from Bridgeton
Posted on 10/13/2015
Nice guide! Very informative for the idioso who figured power on would be the only thing to worry about. Many thanks.